
How to Paint Cabinets: What brush and roller should I use?
Have you ever considered painting cabinets in your home? I considered it for months….okay, for YEARS…until I finally decided to go for it. Why did I wait so long?
Because I wasn’t confident that I would be able to get a perfectly smooth finish on them. Fortunately, since then I’ve found the perfect brush and roller for painting cabinets. The finish is SO smooth. It looks professional! Ever since then, I’ve been painting cabinets like crazy.
I recently painted a bathroom vanity at our cabin and in this tutorial I’ll walk you through exactly how I did it. You can easily do the same thing in your home! Keep reading for more on how to paint cabinets.
Thanks to Purdy for sponsoring this post. I received compensation and free product but all opinions stated here are my own. I’ve loved and owned Purdy products for a very long time!
Tools & Materials
- Purdy 2″ Angled Nylox Glide Paint Brush
- Purdy Revolution Jumbo Mini Roller Frame
- Purdy White Dove 1/4″ Nap Mini Roller Cover
- Purdy Paint Pail
- Sherwin-Williams Extreme Bond Primer
- Sherwin-Williams Emerald Urethane Trim Enamel
- Krylon Fusion All-in-One Paint + Primer in Metallic Gold
- Drill
- 220 grit sandpaper
- Tack cloths
- TSP cleaner & rag
Looking to purchase Purdy paint brushes, rollers and other products for an upcoming project? Head HERE to see which retailers near you carry Purdy products.
Time to Complete
It took me 3 days to complete this, given dry times in between coats.
How to Paint Cabinets Tutorial
This is the cabinet that I started with. It wasn’t horrible, but it also wasn’t great. It has a lot of nicks and scratches in it. It is not solid wood and you could tell that by looking at it. It was in fairly good condition though so I knew that painting it would make it look nearly new!

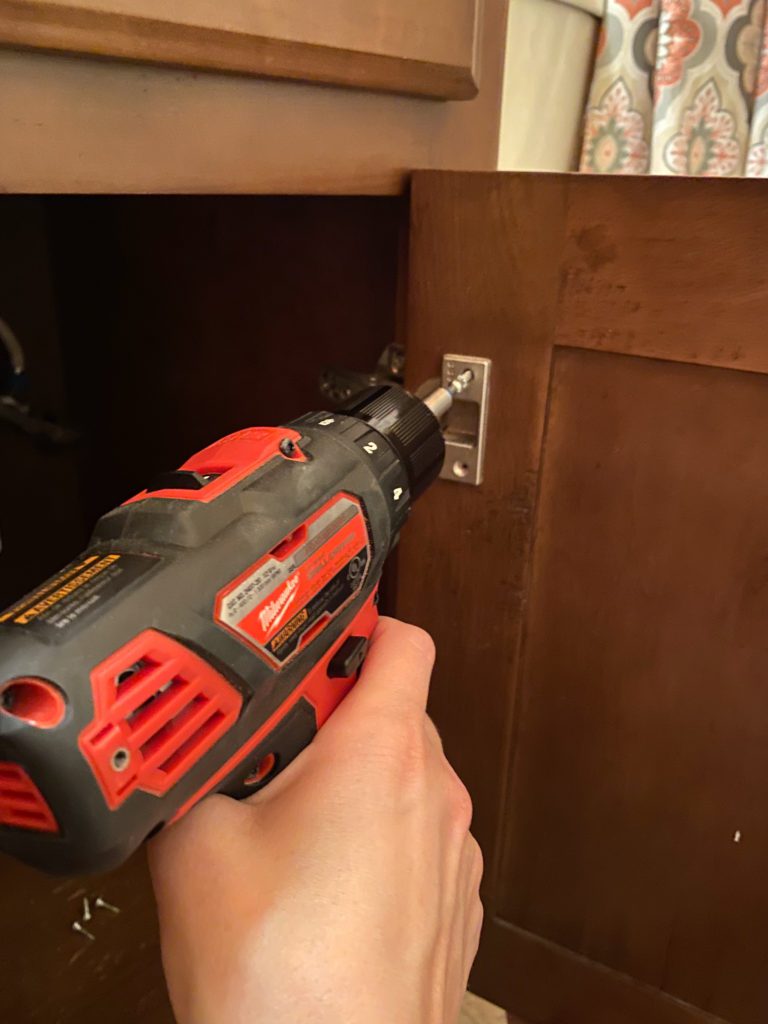
Step 1: Remove Hardware
First remove hardware, such as knobs and pulls. Also remove the doors from the base of the cabinets.
Step 2: Lightly Sand & Remove Dust with a Tack Cloth
Lightly sand your cabinets with 220 grit sandpaper. Remove any dust with a tack cloth.
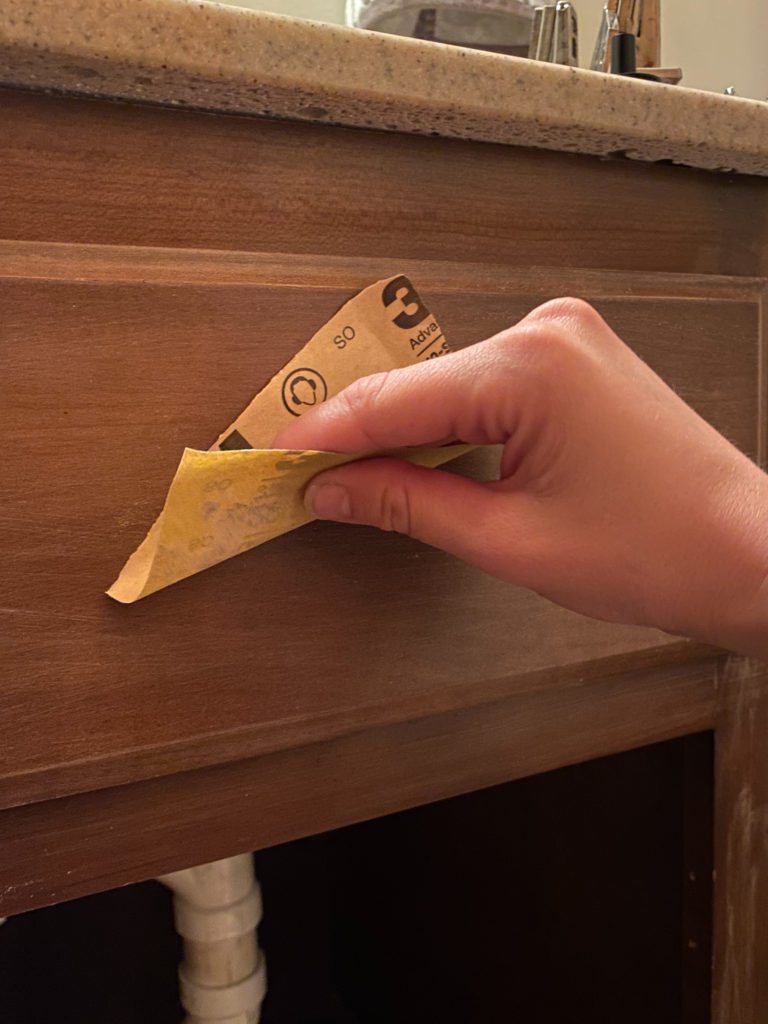
Wash your cabinets with TSP cleaner. Allow to fully dry before painting.
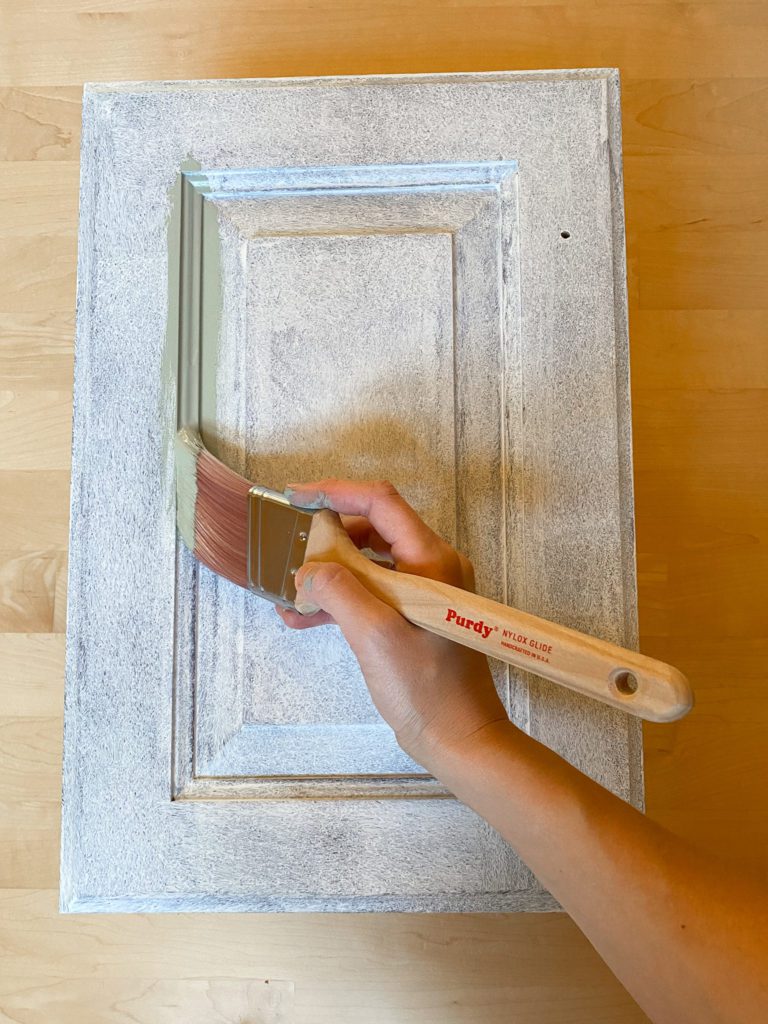
Step 3: Apply Sherwin-Williams Extreme Bond Primer
Here are two secrets to a perfectly smooth finish on painted cabinets:
- The Purdy 2″ Angled Nylox Glide Paint Brush: This brush is my very favorite! I use it whenever I paint furniture. It’s a Purdy brush, meaning that it’s handcrafted and extremely high quality. Also, this specific brush has soft bristles that help you get an ultra smooth finish. Try it – you won’t be disappointed!
- The Purdy White Dove 1/4″ Nap Mini Roller Cover on the Purdy Revolution Jumbo Mini Roller Frame: The mini roller frame is the perfect size for painting cabinets. The 1/4″ nap White Dove roller cover helps you get a super smooth finish on your cabinets. Lower naps give you smoother finishes. Therefore, 1/4″ nap is perfect for painting cabinets

Once you have the proper application tools, make sure you have an awesome primer like Sherwin-Williams Extreme Bond Primer. I’ve used this primer for multiple projects before this and it works great. It doesn’t require much prep and it helps create a surface that your paint will stick to well, even if the surface was really glossy beforehand.
Apply the primer by first painting the crevices and edges of the cabinet. Then use the roller to fill in the larger sections. Keep alternating back and forth, making sure to use the roller before the paint dries in the crevices.

Want another secret to a perfect finish on painted cabinets? Put on a THIN layer of paint! Do not overapply it or it will run, giving your drips in your finish.
Remember that primer is not meant to cover perfectly. It will still do its job even if the coverage doesn’t look perfect. Only one coat of primer is needed.
Step 4: Lightly Sand the Primer and Remove Dust with a Tack Cloth
Once the primer is dry, lightly sand it using 220 grit sandpaper to make it super smooth. Remove any dust with a tack cloth. Now you’re ready to paint on the color of your choice!
Step 5: Apply Two Coats of Sherwin-Williams Emerald Urethane Trim Enamel
Using the same Purdy paint brush and roller you used for the primer, paint on two coats of Sherwin-Williams Emerald Urethane Trim Enamel, allowing for ample dry time in between coats.
This specific paint is made for projects like this: It is self-leveling, helping to create that super smooth finish you are going for. Also, it doesn’t need a protective top coat. It’s very durable without a top coat!
I chose a light sage green that was a custom tint but of course feel free to choose whatever color you like best. If you would like the details of this custom tint, please message me.
The Purdy Paint Pail will be your best friend during this process. It’s a super handy pail that holds your paint, paint brush and mini roller all at once!
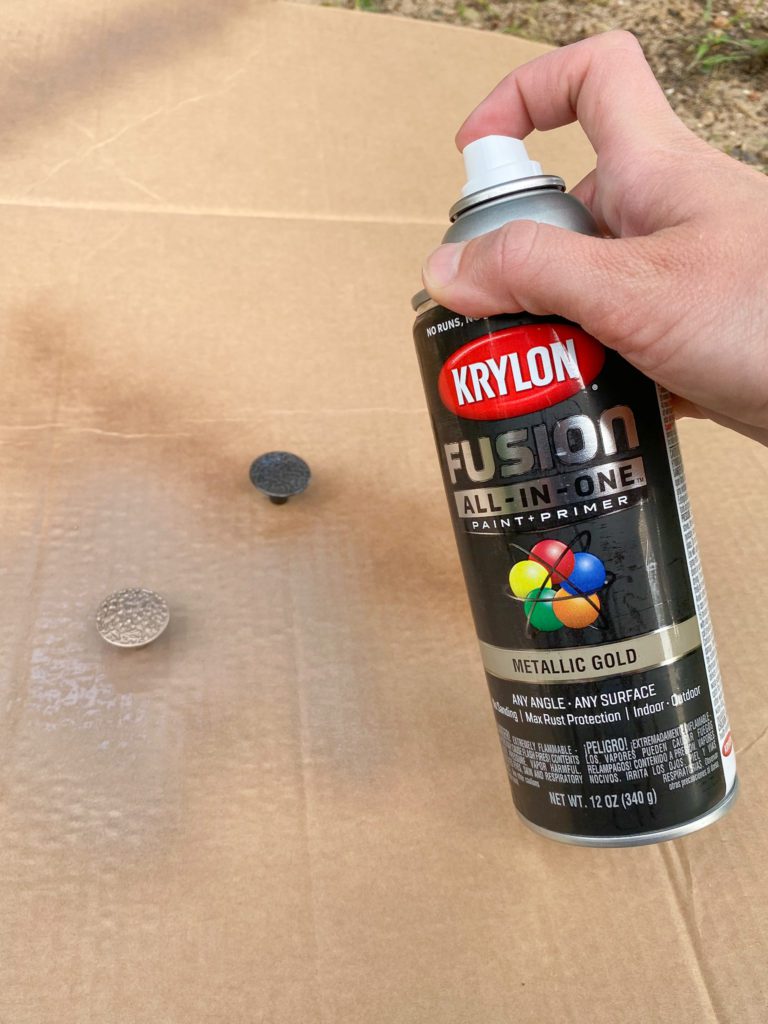
Step 6: Spray Paint Knobs with Krylon Fusion All-in-One Paint + Primer in Metallic Gold
I wanted this bathroom update to be really budget-friendly so I decided to spray paint the knobs rather than buy new ones. It’s amazing what a little spray paint can do!
I used Krylon Fusion All-in-One Paint + Primer in Metallic Gold. It’s a great spray paint that has a no peel guarantee! Also, it has 5X stronger adhesion to difficult surfaces. It’s a great premium spray paint product.
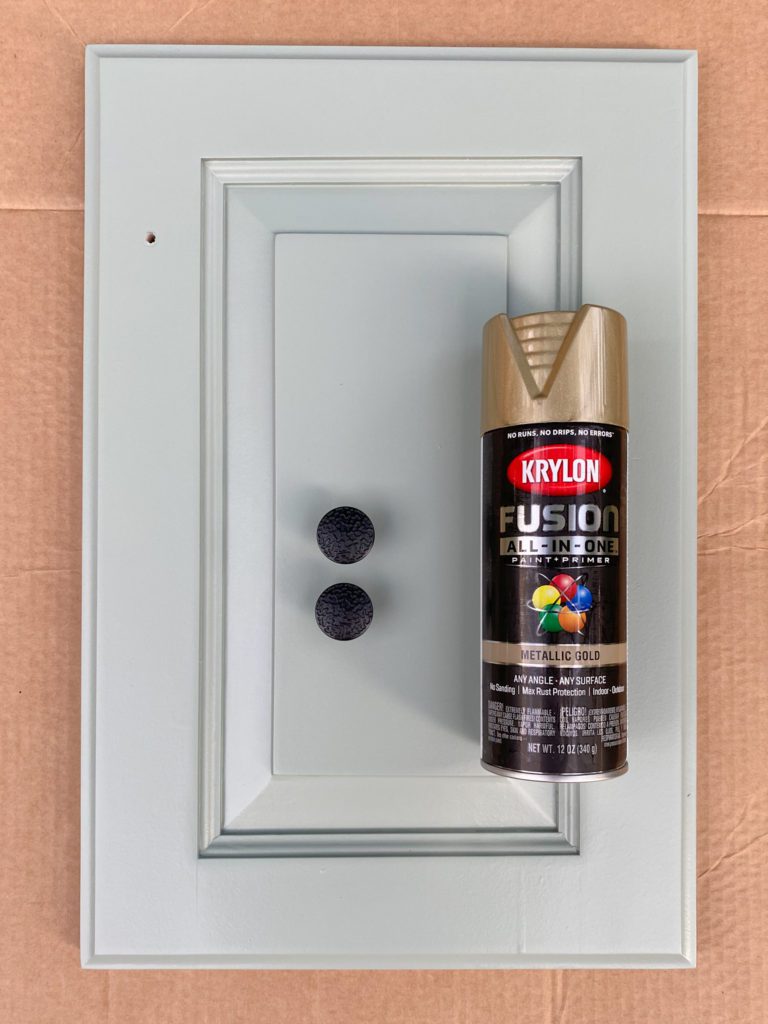
I chose the metallic gold color because I wanted a soft, beautiful color against the light sage green cabinet.
I spray painted the knobs, giving them one light coat followed by an additional light coat a few minutes later.
Step 7: Reattach the Doors & Knobs
Once the doors and knobs are reattached, you are set to go!
The Finished Painted Bathroom Cabinets
And….DONE! You can now take a step back and admire your work. I love how painting this cabinet took this bathroom from a worn, dark look to a light, bright, clean and airy look. I love it!
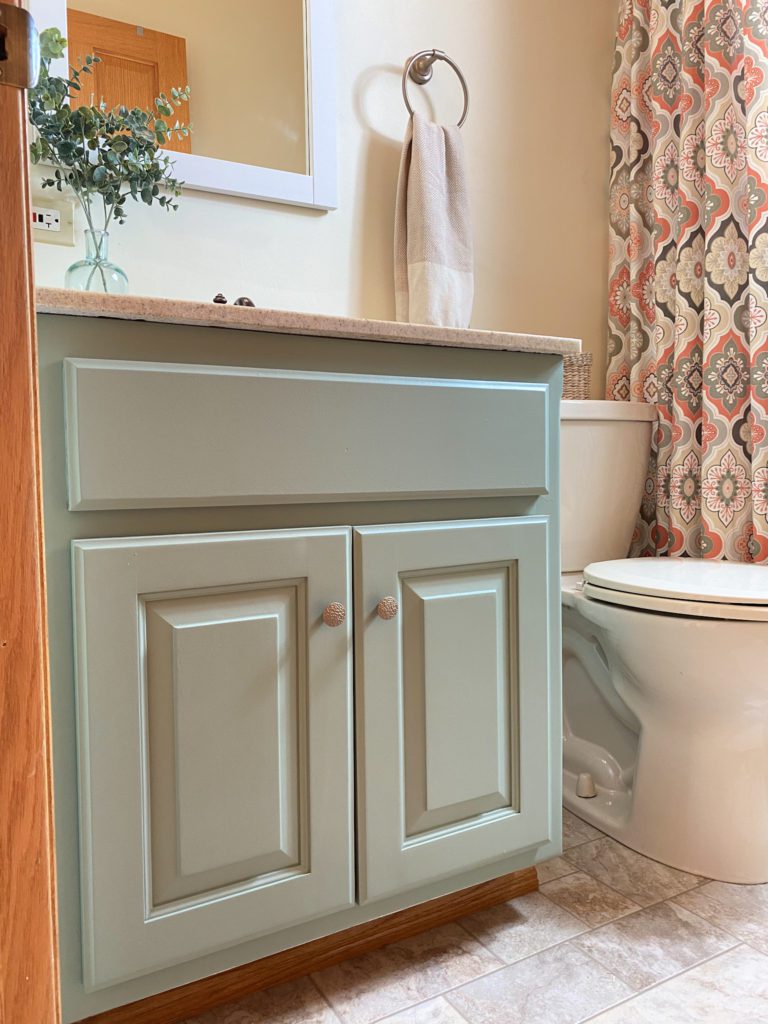
I also replaced the mirror with a larger upcycled mirror that fits the space better.
I have more plans up my sleeve for this bathroom but for now, it’s already about a million times better.
Want More Home DIY Project Ideas?
Head here to browse all my recent projects.
Sign up here for emails from me so you always see the latest and greatest home DIY projects!
Or head to Instagram to browse through all my recent projects and follow me to keep seeing more.


