Bringing to life Cabot’s 2023 Trend of the Year: Create an Outdoor Gathering Space!
Sitting out back around a fire. Gathering family together for a child’s birthday party. Enjoying dinner with friends on your patio on a gorgeous summer day. Cold drinks in hand. Good food to share. The best company. Nothing is quite like gathering outdoors!
For Cabot’s 2023 Trend of the Year, they chose “Creating an outdoor gathering space.” They asked if I would help announce this trend by creating a beautiful gathering space at my home. Of course I said I’d love to! And that’s how this project came to be.
I hope this project tutorial inspires you to create a cozy space outdoors for gathering with friends and family. Some items for this space I already had, such as some chevron-pattern patio furniture, a rug, and lights. However, with this project, I added two end tables and a carrying tray to make the space even more functional and beautiful.
Thanks to Cabot for sponsoring this post. I received compensation but all opinions stated here are my own. I’ve loved and used Cabot premium woodcare products for a long time.
Tools & Materials for End Tables & a Carrying Tray
- Cabot Solid Color Acrylic Stain + Sealer in Newburyport Blue
- Cabot Semi-Transparent Stain + Sealer in Newburyport Blue
- Purdy 2″ White Bristle Sprig Brush
- Purdy 2″ XL Sprig Paint Brush
- Two 15″ round wood panels
- Six 22″ tapered furniture legs
- Six angled top plates
- 1″x4″ 6′ oak board
- 1/2″x3″ 3′ oak board
- Tape measure
- 220 grit sandpaper
- Tack cloth
- Wood glue
- Clamps
- Super glue
- Drill and drill bits
- Handles for carrying tray (I purchased drawer pulls)
Wondering where you can purchase Cabot premium woodcare products? Head HERE to see what retailers near you carry Cabot products.
Time to Complete
It took me 2 days to complete this project, given glue and stain dry times. It took about 5 hours of work.
Outdoor End Tables & Carrying Tray Tutorial
STEP 1: Attach the furniture legs to the round panels.

First screw in the top angled plates to the round panel. Ensure that they are evenly spaced around the circle. I placed mine so that where the leg would be inserted is 5 inches from the center of the circle. Exact spacing can vary depending on your preferences for leg positioning.
Next screw the legs into the plates. Do this for both tables.
STEP 2: Cut the boards for the carrying tray.

Using a miter saw, cut the 1″x4″ 6′ oak board into 3 pieces, each 18″ long and cut at 90 degree angles on each end.
Then cut two 8 1/2″ pieces from the 1/2″x3″ oak board. Each end is cut at 90 degrees.
STEP 3: Glue the tray boards together and clamp them.
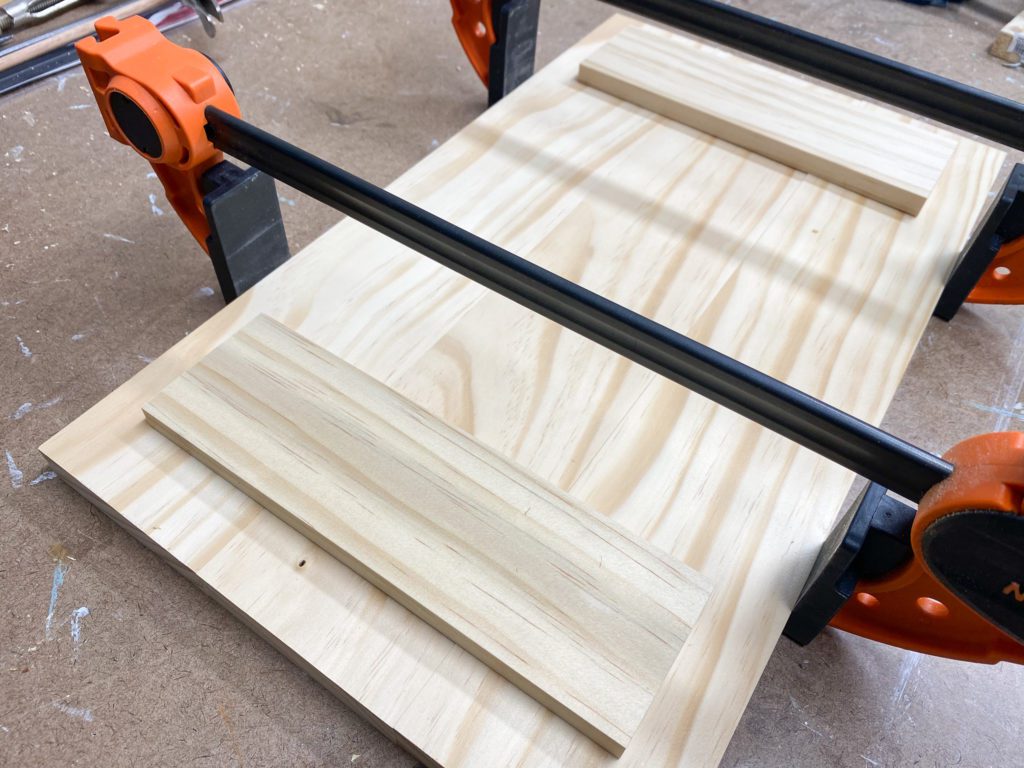
Use wood glue to glue together the 3 18″ boards to form the base of the carrying tray.
Clamp them together until the glue dries.
Then glue the 8 1/2″ pieces across the base pieces to form a place where the carrying tray handles will go. You can also use brad nails to keep these pieces extra secure.
STEP 4: Sand end tables and the carrying tray with 220 grit sandpaper.

Just do a quick sand of the wood to prep it for stain. Remove any sanding dust with a tack cloth.
STEP 5: Stain the end tables using Cabot Solid Color Acrylic Stain + Sealer in Newburyport Blue.

Cabot has amazing, high-quality exterior stain. They have various levels of opacity. I’ve used Cabot stain on a back deck, our cabin, a planter, and more and have found it to be very durable.
For these end tables, I decided to go with a solid opacity stain. This means that you can barely see the wood grain through the stain. I applied Cabot Solid Color Acrylic Stain + Sealer with a Purdy 2″ XL Sprig Paint Brush.
You simply brush on one coat and let it dry! I love how it’s a simple one-step process.
STEP 6: Stain the carrying tray using Cabot Semi-Transparent Stain + Sealer in Newburyport Blue.

I love seeing how different stain colors look when you change the opacity. Therefore, for the carrying tray, I applied Cabot Semi-Transparent Stain + Sealer using a Purdy 2″ White Bristle Sprig Brush.
The wood grain really shows through this semi-transparent stain. It looks significantly different than the solid opacity stain. Both are beautiful – just different looks!
I applied just one coat and let it dry.
STEP 7: Attach handles to the carrying tray.
The type of handles you choose can depend completely on your style and the look you are going for. I chose matte black handles and attached them with super glue.
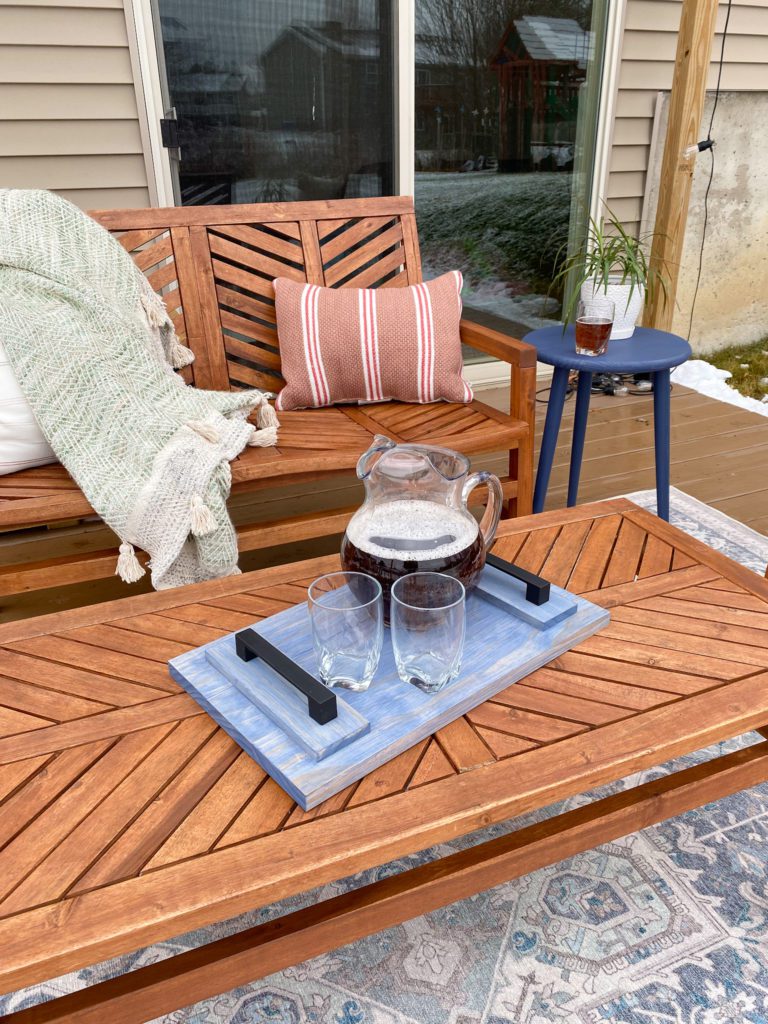
STEP 8: To complete your outdoor gathering space, add other patio furniture, a rug, and lights.
Make the space extra cozy with blankets and pillows. Add a nice cold pitcher of tea and lots of friends!
The Finished Outdoor Gathering Space!
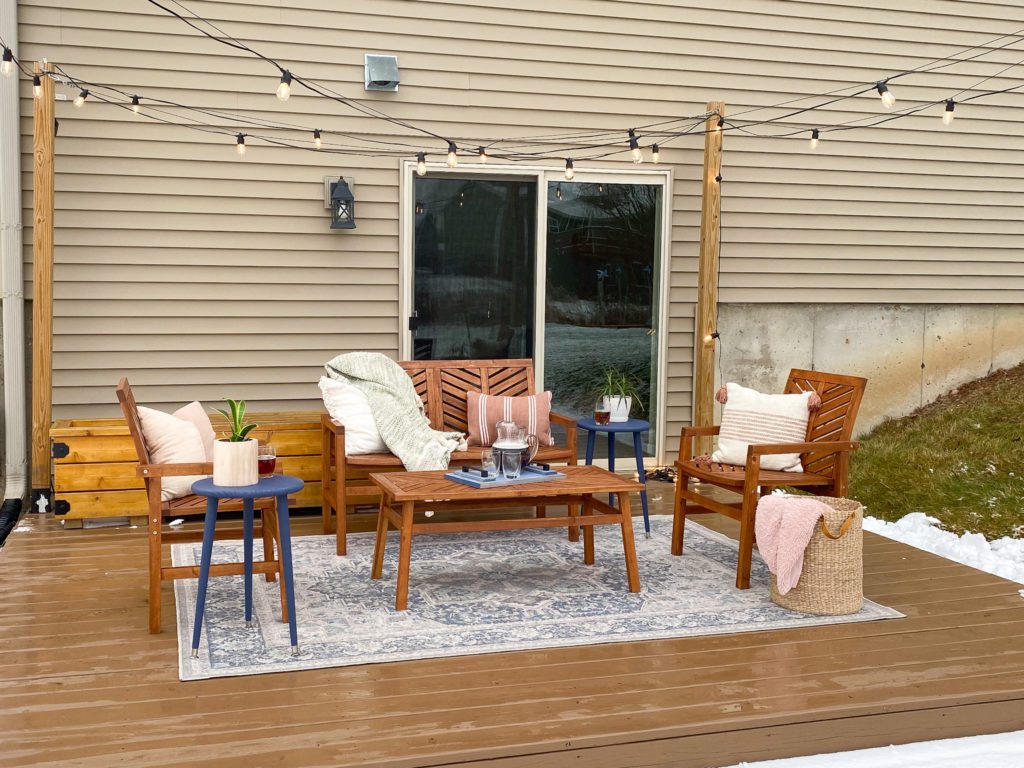
Here’s the completely finished space! I love how the blue end tables and carrying tray coordinate well with the blue in the rug.

Here you can really see how the wood grain just barely shows through this Cabot Solid Color Acrylic Stain + Sealer.
Ready to gather together this spring?! I sure am!
Have any questions? Want to see more outdoor staining projects?
If you have any questions, leave a question below in the comments. I’d love to hear from you!
If you’re interested in seeing other staining projects:
Head HERE to see a budget-friendly outdoor planter with a bold color stain!
Have a deck that needs a fresh coat of stain? Click HERE to see how to accomplish a deck staining project.
Head HERE to explore Cabot’s premium woodcare products.