How to Make Easy DIY Wood Christmas Ornaments
I LOVE Christmastime! I love lights and trees and everything that Christmas has to offer. Every year I try a few new Christmas DIY projects that I can keep for myself or give away as gifts. This year I decided to make easy DIY wood Christmas ornaments using my scroll saw. They are super simple to make! And the options for shape and color are nearly endless.
Thanks to Minwax for sponsoring this post. I received compensation from Minwax but all opinions stated here are my own. I’ve used and loved Minwax products for years!
Time to Complete
2 days, with about 4 hours of work across the 2 days
Tools & Materials
- Minwax Water-Based Pre-Stain Wood Conditioner
- Minwax Wood Finish Water-Based Solid Color Stain in Gentle Olive
- Minwax Color Wash Transparent Layering Color in White Wash
- Minwax Pre-Stain Wood Conditioner for Oil-Based Stains
- Minwax Wood Finish Penetrating Stain in Special Walnut
- Minwax Polycrylic Protective Finish in Matte Finish
- Purdy 2” XL Sprig Paintbrush
- Synthetic Pad
- 220 Grit Sandpaper
- Tack Cloth
- Rags
- 1 1/4″ × 4″ 4′ Oak Board
- Scroll Saw
- Drill
- Scissors
- Painter’s Tape
- String or Twine
- Ornament Hooks
- Patterns from the internet
Click HERE to find a local retailer for Minwax products!
Easy DIY Wood Christmas Ornaments Tutorial
STEP 1: Find patterns online of what you want to cut out
I normally just search phrases like “state of Wisconsin outline,” “Christmas tree outline,” and such, and then look at the image results. Before you print them, you can adjust the scale of them to get the exact size that is right for your piece of wood.
STEP 2: Cut a rectangle around the patterns and tape them to the 1/4″ thick oak board
STEP 3: Cut out the patterns using a scroll saw

STEP 4: Sand down the ornaments, especially the edges, using 220 grit sandpaper.

STEP 5: Drill 1/8″ holes in the top of the ornaments for hanging purposes.

STEP 6: Apply pre-stain wood conditioner to the ornaments.
Pre-stain wood conditioner is important because it helps prepare the wood for stain and helps prevent blotchiness when the stain is applied. Furthermore, water-based pre-stain wood conditioner helps control grain raising, which can often happen with water-based stain.
If you plan to use oil-based stain, make sure that you are applying OIL-based pre-stain wood conditioner such as this one. If you plan to use water-based stain, make sure you are applying WATER-based pre-stain wood conditioner such as this one.
For the Minwax Pre-Stain Wood Conditioner for Oil-Based Stains, apply it with a rag. Allow it to penetrate the wood for 5-15 minutes and then wipe off any excess. Make sure to stain the wood within two hours.

For the Minwax Water-Based Pre-Stain Wood Conditioner, apply it with a synthetic brush like a Purdy 2” XL Sprig Paintbrush. After 1-5 minutes, remove any excess with a rag. After 15-30 minutes, sand with 220 grit sandpaper to remove any raised grain. Next remove any dust with a tack cloth. Now you are ready to stain.

STEP 7: Apply stain
I decided to use three different types of stain on my ornaments. You could use these exact stains and colors or different ones. Minwax has a wide variety of staining products and colors to choose from!
I used a more traditional oil-based stain on two of my ornaments. Minwax Wood Finish Penetrating Stain in Special Walnut gives wood a rich, transparent, brown color. I applied it with a rag, removing any excess with a clean rag after 5 minutes (you could wait up to 15 minutes). The longer you wait to remove the stain, the darker the finish will be.

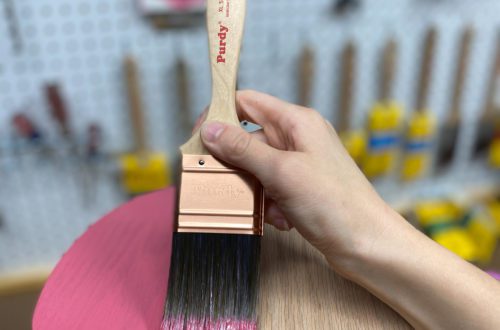
I used a fun green color stain on two of my other ornaments. Minwax Wood Finish Water-Based Solid Color Stain comes in over 200 colors! It dries quickly, cleans up with soap and water, and is 5 times thicker than traditional stains. It has a solid opacity so you can only just slightly see the wood grain through it. I’ve used it many times and it’s always fun to work with! I chose their Gentle Olive color, which is one of my favorite colors they offer.
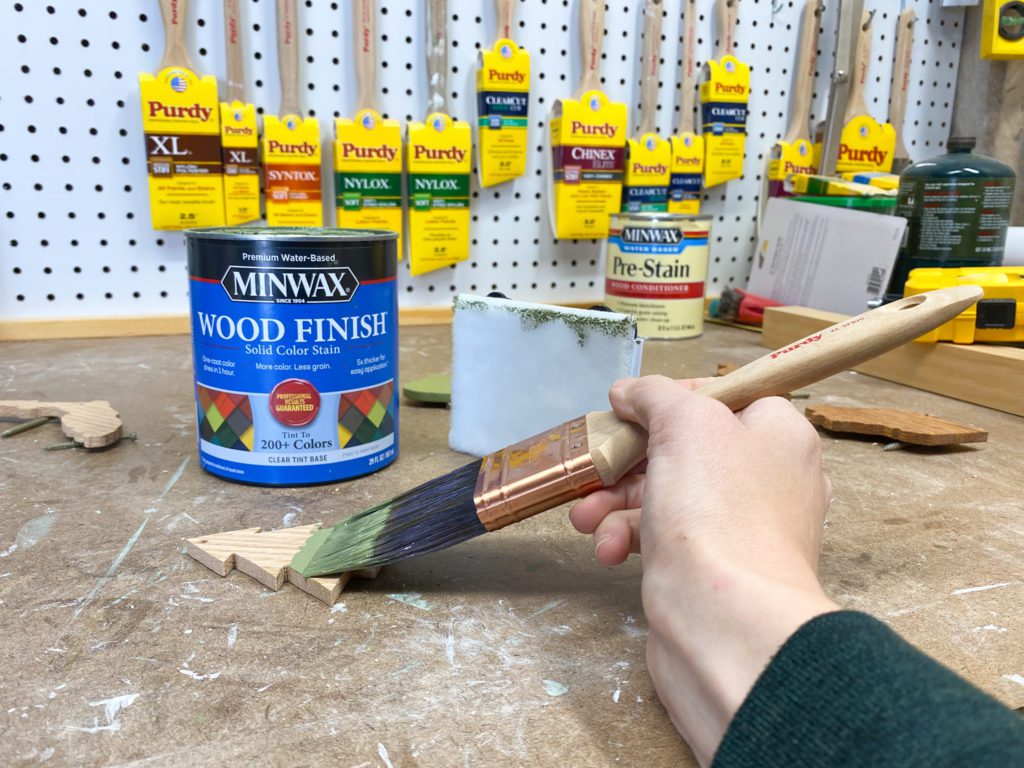
I applied this stain using a Purdy 2” XL Sprig Paintbrush. I immediately (within 2 minutes) removed any excess stain using a synthetic pad.
For my third and final stain, I used a color wash for a light white wash look. Minwax Color Wash Transparent Layering Color in White Wash leaves wood with a beautiful, soft white washed glow. This stain is water-based so it’s easy to clean up and it dries quickly.

I applied this color wash with a Purdy 2” XL Sprig Paintbrush, going against the wood grain. I immediately (within 2 minutes) removed any excess color wash using a rag. I went against the grain as I wiped it off.
STEP 8: Add twine or strings and ornament hooks for hanging
STEP 9: Once stain is dry, apply Minwax Polycrylic Protective Finish in Matte Finish

Apply the polycrylic using a Purdy 2” XL Sprig Paintbrush. Once dry, lightly sand with 220 grit sandpaper. Remove dust with a tack cloth and apply one more coat of polycrylic.
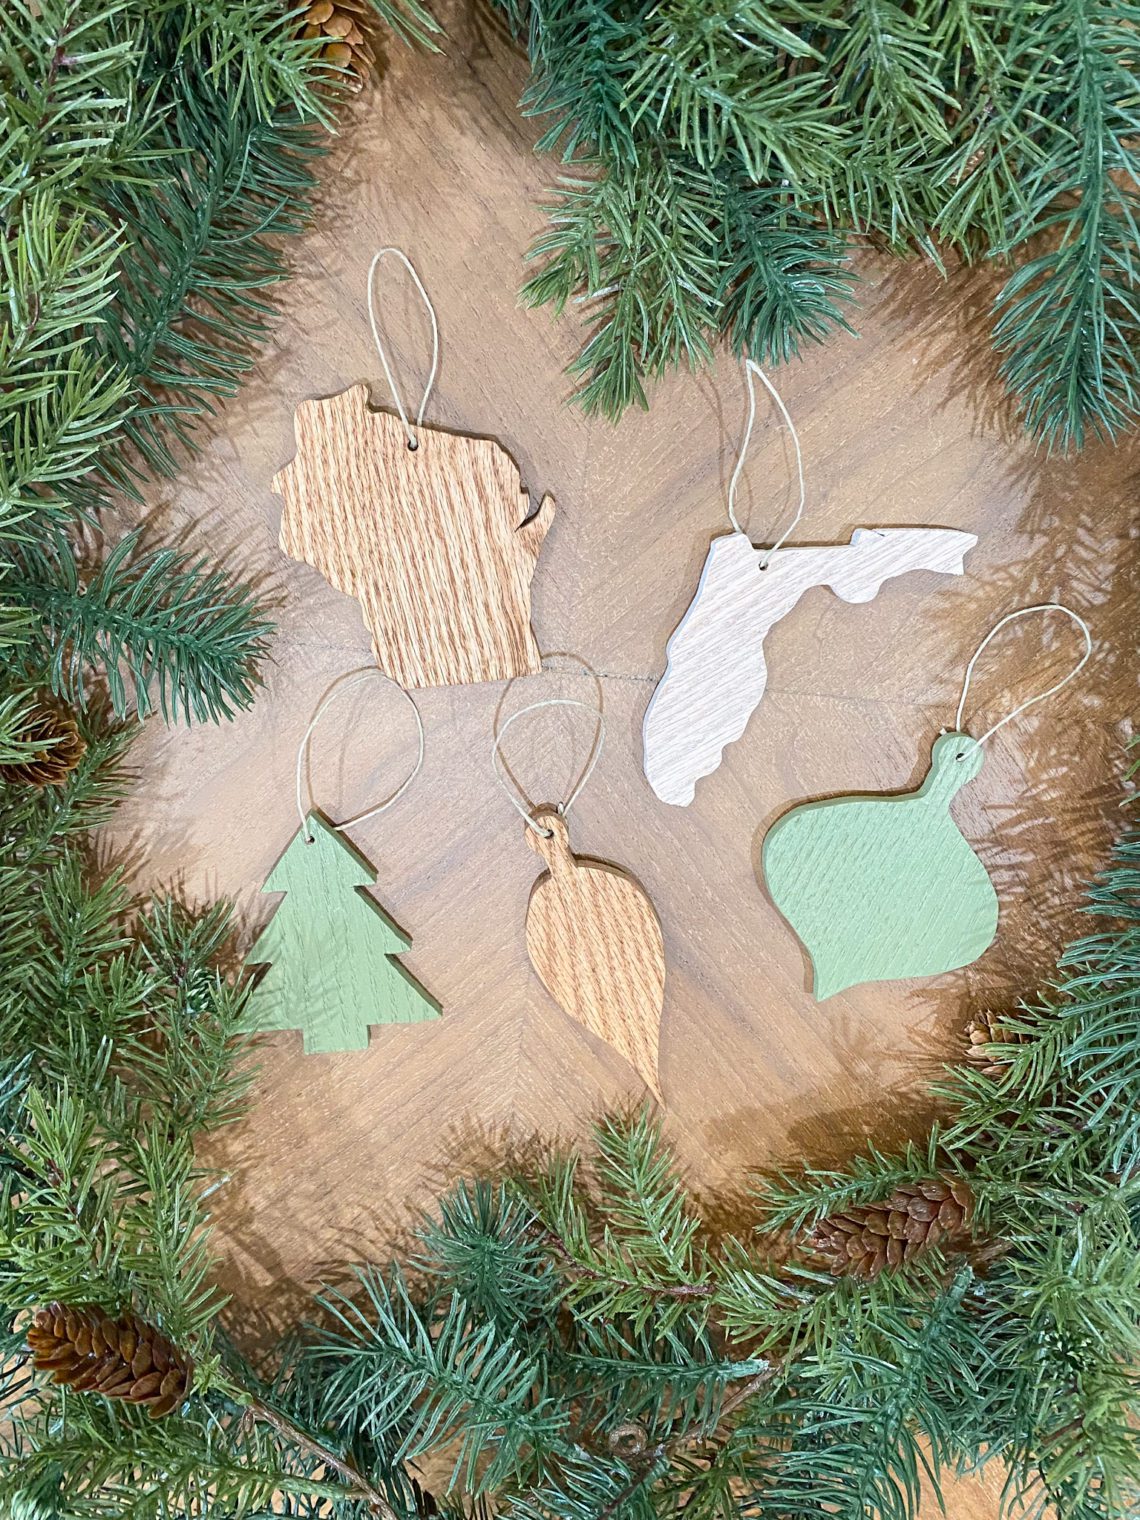
The Completed Ornaments: Easy DIY Wood Christmas Ornaments
Then you’re done and you have beautiful ornaments for your tree or for a gift for others!

There are endless options for what you could make from the wood: states, names, snowmen, family silhouettes, etc.

Looking for more staining projects?
Head here for 5 AMAZING staining tips and a tutorial on how to build a nightstand for a toddler.
Follow along with me on Instagram and Pinterest to see all my past projects and be in the know when my future projects happen!
Head to the Minwax website for more project ideas and to explore all their different amazing stain colors!